Thursday, September 30, 2010

Felt Barrettes for Dee's Birthday (78:365)

She already had a big party, but tomorrow is the actual Big Day.
Sweet little Dee is gonna be 3!
I can't believe my baby is so old. 
Sniff.

So, as a little gift, I made her a sweet little monogrammed felt barrette (which I lazily took a picture of with iPhoto and now it looks like I'm a dummy and can't do a "J" correctly. It's iPhoto, not me.)...


And this adorable little bird which I might steal sometimes.

A little shout out to one of my new favorite inspiration blogs MADE for some inspiration.


Update: Here is Jane wearing her cute J.

Wednesday, September 29, 2010

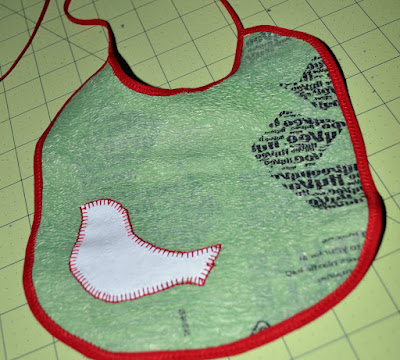
Baby Bib from Fused Plastic Bags (77:365)

This is what I made from the fused plastic bags I did yesterday.
Stinkin' cute!
I saw the ones they had done and knew I could totally do it too! 
I'm loving it.
This side is made from some vintage fabric scraps, 
rick rack, and single fold binder's tape I found at an estate sale a couple of weeks ago.

And this side is made from the fused plastic bags, the little bird too.

I machine appliqued the birds and sewed around the edges of the rick rack because, as a mom, I know that some grody stuff can show up in tiny cracks near babies, so I wanted those suckers closed.

Now, I'm not going to lie and say it was easy, 
but nothing ever is the first time (at least not for me!).
I trouble shot a bit and played around with the design for a while, but in the end, it really was pretty simple and fun to do! Next time will be much faster. 

Look at this little peanut. She is a dolly.
We'll just pretend she is smiling because she loves the bib.

I imagine that this can machine wash, but then it will need to air dry because of the plastic...

Tuesday, September 28, 2010

Fusing Plastic Bags (76:365)

Did you know that you can make a usable "fabric" out of old plastic bags? We have tons of them (over shopping + never remembering to bring my reusable bags...) and this is such a great way to use them. I've been googling all afternoon about it and am really excited to try it out! This blog was the absolute best one with great tips and warnings about it.

 You will need to layer 6-8 pieces of plastic in the end. 
Some say to melt all at once together, but that blog I listed above said to do 2 layers at a time, which worked best for me.
First I cut off the handles and base of the bag.

Then I sandwiched it in between freezer paper 
because one website said I could.
Don't do it! 
It became one solid freezer paper lump.

Then I sandwiched a new 2 layers (with printed sides of the bags inside out because the ink can bleed) between 2 pieces of parchment paper and ironed, constantly moving the iron all around, for 10-15 seconds, then flipped it all over and did the same on the other side. 
It took probably 6 tries before I was able to figure out a good temperature for my iron that didn't shrink my plastic and allowed it to all fuse well without too many lumps.
I kept expecting the plastic to be super smooth, this does not happen.
It is a little bumpy. The main thing to worry about it that the layers are fusing together properly. 
Stop after ironing and feel the plastic between your fingers to make sure they are fused well. If they aren't, go over with the iron again, moving around quickly, until well fused 
(or you'll end up with weaker "fabric").

Lesson's Learned:
-Make sure you have good ventilation when doing this.
-Remember, the bags are hot after being ironed.
-Practice different temperatures to find the best for your iron.
(My perfect temperature is right in between acrylic and nylon.)
-Keep that iron moving or you'll shrink your plastic.

Tomorrow I'll post a project I'm making with the plastic "fabric".

Monday, September 27, 2010

Brown Petal Flower Barrette (75:365)

My friend gave me a much more elegant version of this barrette for my birthday (which I LOVE) and I decided to try and replicate it. I'm really not that happy with it to wear myself, but I think it will look cute on Dee. 

This is a terrible picture of it, but I guess it represents how I feel about it, drab.
Oh well. At least I tried, I guess.


Here's to tomorrows project turning out better!

Feeling overwhelmed today and wishing I had a serger so I could make these darling little bows. I tried them on my sewing machine and it was a sad mess. 
Sigh.
I shall not covet my neighbors serger...

Sunday, September 26, 2010

Chaos into Organized Matter (74:365)

With the party over, Scott's Comprehensive Exams done, and my problem with bringing too much into our home and taking nothing out...our house has turned into a chaotic disaster this week.

Today's project was to clean the pantry and cupboards and toss expired stuff and organize the good stuff. 
It probably took an hour or two (in mommy time, so I don't really remember how long I was working on it), but it was well worth it. I now know where everything is and what we have so I can plan dinner for the week and know what foods we need to use up asap before they go bad. 

That's one thing that really steams me up. 
When food goes bad before it gets eaten. 
I know that as the homemaker it is mostly my fault, but there are other people who live here too that could find food if they tried. 
Ahem.
But I digress...

Anyway, the cupboards are (mostly) organized and ready for efficient use.
Bravo.

Next it's on to organizing fabric and sewing projects.
Sigh. 

P.S. Does anyone from here know where the local food bank is and their policy on donations?

Saturday, September 25, 2010

Rainbow Cake for Dee: Part 2 (73:365)

Dee's party was a smashing success!


The cake went very well.
It looked so pretty up on it's pedestal. 


Dee LOVED it to bits.
And that's all that really matters.


After baking and cooling the cake layers, I then layered them on the cake pedestal, according to Roy G. Biv, and put a layer of frosting in between each one.


Then I frosted the outside. 
Since I'd refrigerated it for a while before decorating it, the frosting was hard and did not want to accept the skittles onto it's sweet frosting coating...have no fear, flaming torch is here! 
Yes, I used a torch to melt the frosting a bit so that I could get the skittles to stick. 
I like to think of myself as resourceful, not insane. 
Thank you.


So, then I decorated it with a skittle rainbow and a number 3.
Doesn't look like a 3. 
I know. 
I was nervous making the rainbow, so I made it too small, it ended up really tight and smushed, and then the 3 just looks weird. My friend Julie told me she thought it was all a cute rainbow umbrella.
She's very sweet.
Let's just pretend that's what it is.


The pretty insides.


The remains of the day.


Here are the steps for making this lovely cake.
1. Prepare two White cake mixes.
2. Evenly pour batter into six bowls.
3. Add food coloring until desired colors are achieved (I prefer the gel type that you can buy at a craft or specialty store, or sometimes Wally-World).
4. Bake each layer according to directions on box, only, more like for 12-15 minutes since the layers are smaller than the box says to do.
5. Let cool completely.
6. Begin to layer the cake on desired serving platter, adding a layer of frosting between each colored layer. (Baker's tip - add a thin layer of frosting between bottom cake layer and the serving platter to help stabilize the cake. Thanks mom!)
7. Frost the outside.
8. Decorate
9. Enjoy!

Friday, September 24, 2010

Recycling Old Crayons (72:365)

For Jane's party tomorrow, I decided to make some rainbow crayons to put into the treat bags. I found this quick little tutorial at one of my favorite blogs, indietutes.


 It's a very easy process that even Jane enjoyed,
helping me the entire time (that is a FEAT I tell you!).


Step 1: Gather all old and broken crayons.
(I am a collector of restaurant crayons, merely for this project.)


Step 2: Tear off paper.


Step 3: Sort crayon pieces by color and break into tiny bits.
Jane really enjoyed this step. Breaking them is the best part!


Step 4 (optional): Take a picture of a cute baby.
If you don't have a baby, you can borrow mine when I need a nap.


Step 5: Spray mini muffin tin with oil.


Step 6: Put broken pieces into muffin tin, layering how you want it to turn out.


Step 7: Bake at 200 degrees until they are melty.


Tip: I'm pretty sure I cooked my for too long because they started to separate, the tops got all oily and they don't work to color from the oily part. I kept waiting for all the chunks to melt down, but I don't think that is really necessary. As long as most of it is melty, they will all harden back up together anyway.

Step 8: Let it cool for a while, then put into fridge or freezer to harden them back up.

Step 9: Tip muffin pan, and they should pop right out!


Stop taking pictures, mom!

LinkWithin

Related Posts with Thumbnails