Showing posts with label plastic bags. Show all posts

Wednesday, September 29, 2010

Baby Bib from Fused Plastic Bags (77:365)

This is what I made from the fused plastic bags I did yesterday.
Stinkin' cute!
I saw the ones they had done and knew I could totally do it too! 
I'm loving it.
This side is made from some vintage fabric scraps, 
rick rack, and single fold binder's tape I found at an estate sale a couple of weeks ago.

And this side is made from the fused plastic bags, the little bird too.
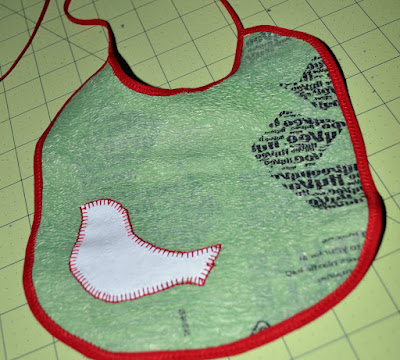
I machine appliqued the birds and sewed around the edges of the rick rack because, as a mom, I know that some grody stuff can show up in tiny cracks near babies, so I wanted those suckers closed.

Now, I'm not going to lie and say it was easy, 
but nothing ever is the first time (at least not for me!).
I trouble shot a bit and played around with the design for a while, but in the end, it really was pretty simple and fun to do! Next time will be much faster. 

Look at this little peanut. She is a dolly.
We'll just pretend she is smiling because she loves the bib.

I imagine that this can machine wash, but then it will need to air dry because of the plastic...

Tuesday, September 28, 2010

Fusing Plastic Bags (76:365)

Did you know that you can make a usable "fabric" out of old plastic bags? We have tons of them (over shopping + never remembering to bring my reusable bags...) and this is such a great way to use them. I've been googling all afternoon about it and am really excited to try it out! This blog was the absolute best one with great tips and warnings about it.

 You will need to layer 6-8 pieces of plastic in the end. 
Some say to melt all at once together, but that blog I listed above said to do 2 layers at a time, which worked best for me.
First I cut off the handles and base of the bag.

Then I sandwiched it in between freezer paper 
because one website said I could.
Don't do it! 
It became one solid freezer paper lump.

Then I sandwiched a new 2 layers (with printed sides of the bags inside out because the ink can bleed) between 2 pieces of parchment paper and ironed, constantly moving the iron all around, for 10-15 seconds, then flipped it all over and did the same on the other side. 
It took probably 6 tries before I was able to figure out a good temperature for my iron that didn't shrink my plastic and allowed it to all fuse well without too many lumps.
I kept expecting the plastic to be super smooth, this does not happen.
It is a little bumpy. The main thing to worry about it that the layers are fusing together properly. 
Stop after ironing and feel the plastic between your fingers to make sure they are fused well. If they aren't, go over with the iron again, moving around quickly, until well fused 
(or you'll end up with weaker "fabric").

Lesson's Learned:
-Make sure you have good ventilation when doing this.
-Remember, the bags are hot after being ironed.
-Practice different temperatures to find the best for your iron.
(My perfect temperature is right in between acrylic and nylon.)
-Keep that iron moving or you'll shrink your plastic.

Tomorrow I'll post a project I'm making with the plastic "fabric".

LinkWithin

Related Posts with Thumbnails